Crochet Dolphin – following One Cent Crochet’ s free pattern
I’ve crocheted animals before and had a lot of fun doing it. However, this commission came as a challenge because I’ve never made a dolphin before. This was an order for a dear friend of mine, and I wanted to make it perfectly. Usually, I create my own crochet patterns, but this time I decided to follow a tutorial to ensure accuracy.
After searching for a while on Youtube, I found the perfect tutorial: Crochet Dolphin Tutorial – How to Crochet a Dolphin Free Crochet Pattern from One Cent Crochet. The tutorial is easy to follow and beginner-friendly, which was great for me since I still consider myself a beginner even though I’ve been crocheting for more than three years. So, stay with me if you want to find out something new about crochet, or maybe get inspired from my experience following One Cent Crochet’s – Crochet Dolphin tutorial.
Materials I used
Yarn: plush yarn. I work well with Nako – Panda plush yarn, but you can be creative when it comes to yarn and choose the yarn that you work the easiest with. You can try to follow this tutorial using any other type of yarn, just remember to adjust the size of the hook as well.
Hook size: 6 mm
Other tools: scissors, stitch markers – I use yarn scraps as stitch markers, stuffing, safety eyes.
Following the Tutorial
One Cent Crochet’s tutorial is very easy to follow since the very beginning. The instructions are clear, and the video quality is excellent. I appreciate the detailed close-up shots of each step, which makes it easier to understand the more intricate parts of the pattern, such as the tail, especially the joining part. Here are the steps I followed:
Start from tail to nose
Start with the tail, crochet the two pieces separately, and then join them together. Proceed to crochet the body of the dolphin and add the stuffing. Attach the two safety eyes to the body at the specified points. Continue crocheting towards the nose.
Once the body is complete and closed, ensure it’s stuffed evenly for a smooth finish.
Crochet the fins and attach to the body
Crochet the fins separately according to the tutorial and sew the fins to the body of the dolphin at the indicated positions.
Final Touches
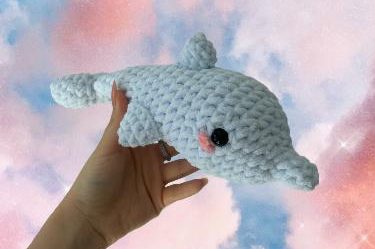
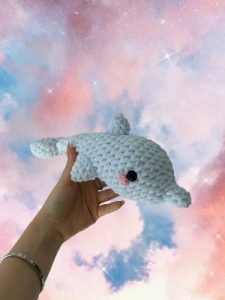
As a final touch, I added some pink plush yarn as blush cheeks to make the dolphin cuter. This step is optional, but I wanted to give it an original and personalized touch.
And… The final result
I’m thrilled with how my dolphin turned out! Here are some pictures of my finished dolphin:
Review and Thoughts
I recommend One Cent Crochet’s dolphin tutorial for any beginner into Amigurumi crochet, or anyone looking to create a cute and realistic crochet dolphin. The instructions are clear, and the final product is adorable. I did find the tail section just a bit challenging, but only because my stitches were very tight. I frogged a few stitches and loosen up the tension. Problem solved!
Also, if you’re new to crochet, take your time with the tail section, and don’t hesitate to pause and rewind the video as needed.
Credit
A huge thanks to One Cent Crochet for this free tutorial. You can find the full tutorial here.
If you try this tutorial, I’d love to see your creations! Feel free to share your photos in the comments and on social media.
